Attached ADU Designs: Complete Guide to Plans, Costs, Permits, and Privacy
/attached-adu-designs-guide
Attached ADU designs are the fastest, most cost-efficient way to add a fully independent apartment, studio, or in-law suite connected directly to your home. They share a wall, roofline, or breezeway with the primary residence — reducing utility costs, preserving yard space, and speeding up permit approvals compared to detached alternatives. This guide covers every dimension of attached accessory dwelling unit planning: definitions, layout types, cost ranges, permit requirements, materials, and a step-by-step process to carry you confidently from first sketch to final inspection. — Article by Daniel Messina, Licensed General Building Contractor. Last updated: 2026-06-11. See our ADU complete guide for broader context.

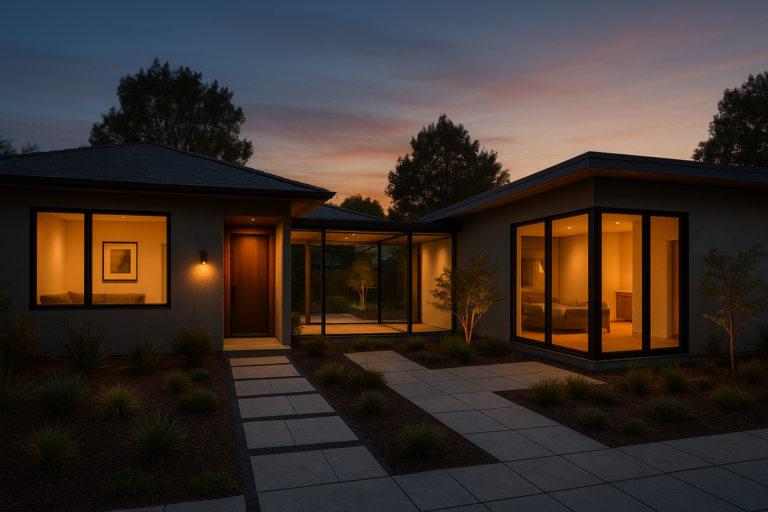
A connected courtyard illustrates how attached ADU designs create privacy while sharing utilities with the primary home. For a deeper walkthrough, see our Best ADU Designs for Southern California Homes.
What Are Attached ADU Designs?
Direct Answer
Attached ADU designs are floor plans for accessory dwelling units — self-contained secondary homes — that physically connect to a primary residence via a shared wall, continuous roofline, or enclosed breezeway. The unit includes its own kitchen, bathroom, sleeping area, and living space, but benefits from shortened utility runs, reduced construction costs, and faster city approvals than a fully detached structure. For broader context, see the ADU complete guide 2025.
In other words, an attached ADU functions as a complete, independent home — with its own lockable entrance — while remaining structurally tied to the main house. This connection is what separates it from a detached ADU (which stands on its own foundation away from the house) and from a junior ADU or JADU (which is created entirely within the existing walls of the primary home).
Additionally, attached ADUs are sometimes called in-law suites, granny flats, accessory apartments, or secondary suites — but regardless of the name, the defining feature is that physical structural connection to the primary residence.
Furthermore, the connection itself is a major practical advantage. Because plumbing, electrical panels, and gas service are already nearby, trenching and utility extensions are shorter and cheaper. In many jurisdictions, attached ADUs also benefit from streamlined permit pathways because they are treated as additions rather than new standalone structures.
Key distinction: An attached ADU is not simply a bedroom addition. It must function as a complete, self-contained dwelling — with cooking, bathing, sleeping, and living areas — and it must have a separate, dedicated entrance that does not require passing through the main home.
Attached ADU vs. Detached ADU: A Thorough Comparison
Choosing between an attached and detached ADU is one of the most consequential early decisions in your project. Therefore, it pays to understand exactly how they differ across cost, privacy, approval speed, yard impact, and long-term value.
Cost Differences
Attached ADUs are almost always less expensive to build per square foot than detached ADUs. The primary reason is utility infrastructure. Because the attached unit shares a wall with the main home, sewer, water, gas, and electrical connections are much shorter — sometimes only feet rather than dozens of feet. Trenching, pipe, conduit, and labor costs all shrink accordingly.
In contrast, detached ADUs require a full foundation independent of the main house, longer utility runs, and separate meter installations in some municipalities. Consequently, for comparable square footage and finish level, a detached ADU can cost 15–30% more than an attached one.
Privacy Considerations
Detached ADUs have a natural privacy advantage — physical separation means sound does not travel through shared walls. However, well-designed attached ADU designs can achieve excellent acoustic separation through strategic assembly choices: staggered stud walls, resilient channel mounting, mineral wool insulation, and solid-core doors along the shared wall.
Similarly, entry placement matters enormously. A side-yard entrance, a courtyard vestibule, or a breezeway connection means occupants of both units rarely cross paths, even on the same property.
Yard Impact
Attached ADUs occupy significantly less open yard space than detached structures. Because they extend from an existing wall rather than standing free, the footprint intrudes on the yard in only one direction. For urban and suburban lots where outdoor space is limited, this is a decisive advantage.
Detached ADUs, by contrast, create a completely separate structure in the yard. While this maximizes privacy, it also consumes more of the lot — which matters for resale value, outdoor enjoyment, and compliance with lot coverage limits.
Permit and Approval Speed
In many jurisdictions, attached ADUs are reviewed as home additions and processed faster than detached structures. Furthermore, states like California have enacted ministerial review laws that prevent cities from applying lengthy discretionary reviews to most ADU applications — meaning straightforward attached ADU designs often receive permits within weeks rather than months.
Detached ADUs sometimes trigger additional review steps, particularly in jurisdictions that cap lot coverage or restrict structures in rear yards.
In summary, neither option is universally better. However, for homeowners with constrained lots, limited budgets, or multigenerational living goals, attached ADU designs consistently deliver superior value per dollar spent.
Five Proven Attached ADU Design Layouts
Not all attached ADU designs work the same way. In practice, the layout you choose depends on your lot shape, existing structure, privacy goals, and budget. Here are the five most commonly built types — each with distinct advantages and trade-offs. For a full design and construction walkthrough, see the ultimate ADU guide.
1. Side-Yard Addition
This is the most common attached ADU layout. The new unit extends from one side of the main house, sharing a long wall and potentially the roofline. Side-yard additions suit lots that are longer than they are wide, and they naturally place the ADU entrance on the side — away from the front door of the main house.
Furthermore, the shared long wall reduces exterior envelope costs and provides the best opportunity to align plumbing stacks between the main home and the ADU bathroom and kitchen. For a deeper walkthrough, see our Backyard Studio Designs: Plans, Costs, and Pro Tips.
2. Rear Addition
A rear addition expands from the back of the primary residence, sharing the rear wall. This layout is particularly effective when the main home sits close to a side property line, leaving no room for a side addition. Additionally, rear additions can connect to existing rear-loading garages or utility spaces.
In contrast to side additions, rear additions typically offer more backyard privacy for the ADU occupant and allow for a south-facing outdoor space — a significant quality-of-life factor. For a deeper walkthrough, see our Backyard Cottage Construction: Cost, Timeline & Pro Tips.
3. Garage Conversion with Addition
Converting an attached garage to living space — and potentially extending it slightly — is one of the fastest routes to a permitted ADU. Because the slab, walls, and roof already exist, structural work is minimal. The main tasks are insulation, egress windows, a kitchen installation, and a dedicated entrance.
Consequently, garage conversions often have the lowest per-square-foot cost of any attached ADU design. However, they require careful attention to floor-level differences, insulation upgrades, and natural light — garages typically have few windows.
4. Breezeway-Connected ADU
A breezeway ADU connects to the main house through a short covered corridor rather than a fully shared wall. This layout provides excellent acoustic and visual separation while still qualifying as an attached ADU in most zoning codes. It is particularly effective on irregularly shaped lots where aligning a flush addition is impractical.
Similarly, the breezeway can double as a utility vestibule — housing meters, laundry hookups, or storage — which keeps mechanical clutter away from both living spaces.
5. Above-Garage Addition
When the lot cannot expand outward, building upward over an attached garage creates a second-story ADU. This layout preserves the full yard footprint and often delivers excellent light and views. However, it requires structural upgrades to the garage framing and foundation to support the added load.
Above-garage designs also present stair access challenges. Therefore, exterior stairways with a private landing are the most common solution — maintaining separate entries while keeping the main home’s interior uninterrupted.

Open layouts help small attached ADU designs feel spacious, bright, and flexible for a variety of living arrangements. For a deeper walkthrough, see our Backyard Studio Designs: Plans, Costs, and Pro Tips.
Size and Floor Plan Options for Attached ADUs
Size selection is one of the most important design decisions you will make. Therefore, match the floor plan to the actual use case — short-term guest stays, long-term multigenerational living, or full-time rental income — rather than simply maximizing square footage.
Studio / Efficiency (300–500 sq ft)
Studio plans combine sleeping, living, and kitchen functions in a single open room with a separate bathroom. They are ideal for single occupants, short-term rental platforms, or guest accommodations that do not need to feel like a permanent home. Additionally, studios carry the lowest construction cost and fit easily on tight lots.
One-Bedroom (450–700 sq ft)
A one-bedroom attached ADU is the most popular size category. It provides a distinct sleeping room — essential for privacy and long-term comfort — while remaining compact enough to fit within most lot coverage limits. This size serves students, single adults, couples, or aging parents equally well.
Furthermore, a one-bedroom plan allows the kitchen and bathroom to stack along the shared wall, minimizing plumbing complexity and cost while maximizing the living area on the opposite side.
Two-Bedroom (700–1,000 sq ft)
Two-bedroom designs accommodate small families, roommate pairs, or multigenerational arrangements where two people need separate sleeping areas. Consequently, they tend to have the highest rental income potential, though they also carry higher construction costs and are more constrained by local size caps.
Many California cities cap attached ADUs at 850–1,200 sq ft or at 50% of the primary home’s area — so verify local limits before committing to a two-bedroom plan.
Accessible / Universal Design Plans
For multigenerational living — particularly when the ADU will house an aging parent — accessible design features are not optional additions but core layout requirements. These include zero-threshold entries, 36-inch-wide doorways, roll-under kitchen counters, curbless showers, and grab bar blocking in bathroom walls. Moreover, aligning floor levels between the main home and the ADU eliminates ramp costs and simplifies daily movement.
How Permits and Zoning Codes Shape Attached ADU Designs
Local zoning laws, state ADU statutes, and building codes directly determine what your attached ADU can look like, how large it can be, and where it can sit on the lot. Therefore, understanding code parameters before finalizing a design prevents costly redesigns. For a deeper walkthrough, see our What Are the Benefits of Building an ADU in My Backyard?. Check permit-ready permit-ready plans.
Size and Setback Rules
Most jurisdictions set a maximum square footage for attached ADUs — commonly 850–1,200 sq ft, or a percentage of the primary home’s floor area. In addition, setback requirements specify how close the new addition can come to side and rear property lines — typically 4 to 5 feet, though some states have mandated specific minimums to enable more ADU construction.
California’s ADU law, for example, prohibits cities from denying an ADU application based solely on lot coverage or floor area ratio — a significant protection for homeowners. The California Department of Housing and Community Development provides detailed guidance on size caps, parking, and review timelines through their official ADU resources.
Fire Separation and Egress Requirements
Attached ADUs share a wall with the primary residence, which triggers specific fire-resistance requirements. In most jurisdictions, the shared wall must be a one-hour fire-rated assembly — meaning it resists fire penetration for at least 60 minutes. This typically requires 5/8-inch Type X drywall on both sides of the shared wall framing, with fire-rated door hardware on any connecting interior door.
Furthermore, egress windows are required in all sleeping rooms — sized and positioned to allow emergency exit. These requirements must be shown on permit drawings with precise dimensions and code references to pass plan check.
Entrance and Kitchen Requirements
To qualify as an ADU rather than a simple addition, the unit must have its own dedicated entrance — a door that leads directly to the outside without passing through the main home. This entrance must be lockable and accessible to the ADU occupant independently.
In addition, a full kitchen — including a range or cooktop, sink, and refrigerator — is required to meet the definition of a complete dwelling unit in most building codes. Some jurisdictions also require a separate address assignment and dedicated mailbox once the ADU is permitted.
Parking and Owner-Occupancy Rules
Parking requirements for attached ADUs vary by jurisdiction. However, many states have reduced or eliminated parking requirements for ADUs within a half mile of public transit — a policy specifically designed to encourage ADU construction. Similarly, owner-occupancy requirements (which historically forced homeowners to live on-site to rent an ADU) have been rolled back in many states, including California, to expand rental housing supply.

A plan view clarifies entries, plumbing stacks, shared wall strategy, and the breezeway connection in an attached ADU design. For a deeper walkthrough, see our How Much Should an Architect Cost to Design an ADU?.
Attached ADU Design Costs: What to Budget
Cost is one of the most-searched topics related to attached ADU designs, and for good reason — projects can vary enormously depending on size, location, finish level, and site conditions. Therefore, understanding the ADU construction costs structure from the beginning protects your budget and prevents unpleasant surprises.
Cost Ranges by Project Type
Attached ADU construction costs in California and other high-cost states typically range from $200–$400 per square foot for standard finishes, with luxury finishes pushing higher. However, because attached ADUs share a wall and utility connections with the main home, total project costs are generally 15–25% lower than comparable detached ADU builds.
- Garage conversion (attached): $80,000–$150,000 — lowest cost option due to existing structure
- Side or rear addition (studio): $120,000–$200,000 for 400–550 sq ft
- Side or rear addition (1-bed): $150,000–$280,000 for 550–750 sq ft
- Two-bedroom addition: $220,000–$380,000+ for 750–1,000 sq ft
- Above-garage addition: $180,000–$350,000 depending on structural upgrades required
Full Cost Breakdown: Every Line Item
A realistic attached ADU budget includes more than just framing and finishes. Specifically, plan for all of the following:
- Architectural design and engineering: $8,000–$25,000
- Permit and plan check fees: $3,000–$15,000 depending on jurisdiction and valuation
- Site work (grading, drainage, concrete): $10,000–$40,000
- Foundation: $15,000–$50,000 (less for garage conversions)
- Framing and structural: $25,000–$60,000
- Mechanical, electrical, plumbing (MEP): $30,000–$70,000
- Insulation and drywall: $12,000–$25,000
- Kitchen and bath finishes: $20,000–$55,000
- Flooring, doors, windows: $15,000–$35,000
- Contingency (10–15% of total): Required — do not skip this line
Return on Investment
ROI from an attached ADU takes three primary forms. First, rental income: a well-designed one-bedroom ADU in Southern California commonly rents for $1,800–$2,800 per month, generating $21,600–$33,600 annually. Second, home appraisal increases: attached ADUs consistently add value to a property, particularly as buyer demand for multigenerational homes grows. Third, caregiving savings: for families housing an aging parent on-site rather than paying for assisted living, the financial benefit can exceed $40,000–$80,000 per year.
Moreover, local ADU financing programs can significantly reduce out-of-pocket costs. For example, homeowners in Southern California should explore available ADU loans in Glendale and similar regional programs that offer low-interest financing specifically for ADU construction.
Privacy, Sound Control, and Livability in Attached ADU Designs
The most common concern about attached ADU designs is privacy — specifically, whether occupants of both units will hear and see too much of each other. In fact, this concern is well-founded if the design ignores acoustic and visual separation. However, with deliberate planning, attached ADUs can deliver privacy that rivals detached structures.
Acoustic Separation Strategies
The shared wall is the most important acoustic surface in any attached ADU design. Therefore, treat it as a sound-control system rather than a structural partition. Specifically, consider these proven assembly options:
- Staggered stud wall: Alternating studs on a wide plate eliminate the rigid path sound travels through standard framing
- Double stud wall with air gap: A 1-inch air gap between two independent stud walls breaks the sound path almost entirely
- Resilient channel: Metal channels mounted between studs and drywall decouple the surface, reducing impact noise by 15–25 dB
- Mineral wool (Rockwool) insulation: Denser than fiberglass batts, mineral wool absorbs sound across a wider frequency range
- Acoustic storage buffer: Placing walk-in closets, laundry rooms, or storage on both sides of the shared wall creates a dead zone — the most effective passive sound barrier
Visual Privacy and Entry Placement
Visual separation starts with the entrance. A side-yard entrance, a courtyard gate, or a dedicated breezeway pathway means occupants of the ADU and main home never share a front door approach — the single most important factor in day-to-day privacy perception.
Furthermore, window placement on the ADU should avoid direct sight lines into the main home’s primary living spaces. Clerestory windows (set high on the wall), frosted glazing on shared-side walls, and strategic landscaping screens all contribute to a sense of complete independence without sacrificing natural light.
Natural Light and Ventilation
Small ADU spaces feel dramatically larger with good natural light. Therefore, prioritize south-facing windows where possible, add skylights or solar tubes over windowless kitchens and bathrooms, and specify high-performance glazing to balance light gain with energy performance. In addition, cross-ventilation — achieved by placing operable windows on at least two walls — reduces dependence on mechanical cooling and improves air quality significantly.
Best Use Cases for Attached ADU Designs
Understanding when an attached ADU is the right choice — and for whom — helps homeowners commit to the design process with confidence. In general, attached ADUs excel in four primary scenarios.
Multigenerational Living
Aging parents or adult children who need proximity but not shared space are the ideal occupants of an attached ADU. The physical connection to the main home provides a sense of nearness and security — critical for elderly occupants — while the separate entrance and independent living space preserve dignity and autonomy.
Additionally, attached ADUs designed for multigenerational use should incorporate universal design features from the start: wide doorways, curbless showers, accessible kitchen heights, and blocking for future grab bars.
Long-Term Rental Income
An attached ADU is a long-term rental asset. In high-demand markets, a one-bedroom attached ADU can generate $1,800–$2,800 per month — income that can cover a significant portion of a mortgage payment while building equity simultaneously.
For rental use, prioritize durable finishes, separate utility metering (where local codes allow), a sound-controlled shared wall, and a truly private entrance path. Renters consistently cite privacy and noise as their top concerns in ADU rentals.
Home Office or Studio Space
A smaller attached ADU — particularly a studio or one-room design — is an excellent dedicated workspace. Consequently, it provides acoustic separation from household noise, a professional address for clients, and a clear psychological boundary between work and home life. Moreover, a dedicated workspace ADU may carry tax advantages if used exclusively for business purposes.
Caregiver Accommodation
For families with a child or family member requiring full-time care, an attached ADU provides a live-in caregiver suite that is physically proximate to the main home without placing the caregiver inside the primary living space. This arrangement improves caregiver retention, reduces response time in emergencies, and provides a professional separation that benefits both parties.
Materials, Systems, and Efficiency for Attached ADUs
Material and system choices in an attached ADU carry outsized importance — because the spaces are compact, every selection affects comfort, acoustics, energy performance, and durability more than it would in a larger home.
Shared Wall Assemblies
As noted in the privacy section, the shared wall between the ADU and the main home requires deliberate sound and fire control. Specify 5/8-inch Type X drywall for fire rating, mineral wool insulation for sound absorption, and resilient channels or a staggered stud configuration for decoupling. Additionally, seal all penetrations — electrical outlets, pipe sleeves, recessed lights — with acoustic caulk or putty pads to prevent flanking paths that undermine the wall’s performance.
Heating and Cooling
Mini-split heat pump systems (also called ductless HVAC) are the dominant choice for attached ADUs. They require no ductwork — which is important in compact spaces where duct routing is difficult — and they provide both heating and cooling from a single system. Efficiency ratings (SEER2) for modern mini-splits are high, translating to low operating costs.
However, if the ADU is a garage conversion adjacent to the main home’s existing HVAC ductwork, extending the existing system may be more cost-effective. Consult a mechanical engineer before making this decision.
Water Heating
Heat pump water heaters — which extract heat from ambient air rather than generating it directly — are the most energy-efficient choice for ADU water heating. They use approximately 60–70% less electricity than standard electric resistance water heaters. Furthermore, they qualify for federal tax credits under current energy efficiency incentive programs.
For attached ADUs sharing a hot water system with the main home, a recirculation pump can deliver near-instant hot water to the ADU while reducing water waste.
Flooring and Interior Finishes
Luxury vinyl plank (LVP) flooring is the leading choice for ADU living areas — it is durable, waterproof, easy to clean, and available in styles that photograph well for rental listings. For acoustic performance, install over an acoustic underlayment rated at IIC 50 or higher. In bathrooms and kitchens, porcelain tile over a mortar bed provides the most durable, water-resistant surface.
Step-by-Step: How to Plan, Finance, and Permit an Attached ADU
A structured process dramatically reduces delays, cost overruns, and permit rejections. Therefore, follow this sequence from feasibility through certificate of occupancy. Explore our custom ADU design services.
-
Step 1 — Site Feasibility Analysis
Map your setbacks, lot coverage limit, utility locations, mature trees, and slope. Identify which wall of the primary home can accommodate an addition without violating setbacks. Additionally, note the location of the main electrical panel, sewer cleanout, water meter, and gas shutoff — these determine your utility connection strategy. - Step 2 — Design Selection and Customization Choose 2–3 custom ADU design services that fit your site width, slope, and sun path. Specifically, test each design against your setback envelope, preferred entry location, and privacy goals before committing to one layout.
-
Step 3 — Code and Trigger Review
Review code requirements for fire-rated shared wall assemblies, egress windows in sleeping rooms, independent entrance compliance, energy code compliance (Title 24 in California), and any local overlay requirements. Consequently, confirm whether your jurisdiction requires owner-occupancy, parking replacement, or impact fees. - Step 4 — Budget Assembly Build a line-item budget covering design, engineering, permits, site work, foundation, framing, MEP, insulation, finishes, and contingency. Moreover, add separate line items for utility upgrades — panel expansion, sewer capacity check, water pressure test — as these are frequently overlooked until construction is underway.
-
Step 5 — Financing
Explore financing options including home equity lines of credit (HELOC), cash-out refinance, construction loans, and ADU-specific programs. For example, homeowners in Southern California should review available ADU loans in Glendale and similar local programs that offer below-market rates for qualifying projects. -
Step 6 — Permit Submission
Submit permit drawings that include a fully dimensioned site plan showing setbacks and entry paths, architectural floor plans and elevations, structural details and load calculations, energy compliance documentation, and fire-rated assembly details. Additionally, pre-application meetings with your local building department can identify issues before submission, saving weeks of plan check time. - Step 7 — Construction and Inspections Mobilize construction with a signed contract that includes a payment schedule tied to milestones rather than dates. Schedule weekly site meetings. Finally, track all required inspections — foundation, framing, rough MEP, insulation, and final — and do not release final payment until the Build an ADU certificate of occupancy is in hand.

A private side entrance maintains independence for ADU occupants without altering the main home’s front elevation. For a deeper walkthrough, see our Apollo.
Case Study: Compact Side-Yard Attached ADU in Stanton, CA
To illustrate how these principles come together in a real project, consider a one-bedroom attached ADU built as a side-yard addition on a standard 6,000 sq ft lot in Stanton, California. For a deeper walkthrough, see our Ashgrove.
The ADU measured 580 sq ft and connected to the main home’s kitchen wall — a strategic choice that aligned the ADU’s kitchen and bathroom plumbing stack directly with the main home’s existing waste and supply lines. As a result, trenching was limited to a 14-foot run rather than the 40+ feet a detached build would have required.
Furthermore, the shared wall was designed as a double-stud assembly with mineral wool insulation and 5/8-inch Type X drywall on both sides — achieving a Sound Transmission Class (STC) rating of approximately 60, which renders normal conversation inaudible between units.
Entry was a private courtyard gate on the side yard, accessed from the street without crossing the main home’s front path. Additionally, a south-facing window wall in the living area brought abundant natural light into the unit while a clerestory window in the bedroom avoided sight lines into the neighboring property.
The total project cost was approximately $195,000 — including design, permits, and construction — and the unit began generating $2,100 per month in rental income immediately upon completion. Consequently, the projected payback period was under nine years.
For more detail on the design decisions and permit process in this project, see the full Stanton ADU design walkthrough at theadupro.com. For a deeper walkthrough, see our Backyard Studio Builder: Costs, Design, and Timeline.
Permit Compliance Checklist for Attached ADUs
Before submitting permit drawings, verify that your plans address every item on this checklist. Specifically, these are the most common reasons attached ADU applications receive plan check corrections.
- Site plan: Shows ADU footprint, setbacks from all property lines, entry path, and driveway/parking relationship For a deeper walkthrough, see our What Are the Benefits of Adding an ADU to My Property?.
- Separate entrance: ADU door opens directly to outside without passing through main home — shown clearly on floor plan
- Fire-rated shared wall: Assembly called out with material specs, thickness, and code section reference
- Egress windows: Sleeping room windows dimensioned and labeled with clear opening area and sill height
- Full kitchen: Range/cooktop, sink, and refrigerator space shown on floor plan
- Plumbing stack alignment: ADU kitchen and bath drain lines shown connecting to main home’s existing system (or new laterals if required)
- Electrical panel capacity: Load calculation confirming main panel can support ADU circuits or showing sub-panel addition
- Energy compliance: Title 24 or equivalent documentation included in submittal package
- Address and mailbox: Confirm whether jurisdiction requires separate address assignment
- Utility shut-offs: Locations of shared and independent shut-offs shown and labeled for both units
Frequently Asked Questions About Attached ADU Designs
What exactly are attached ADU designs?
Attached ADU designs are architectural floor plans for accessory dwelling units that physically connect to a primary residence through a shared wall, common roofline, or enclosed breezeway. The resulting unit is a fully self-contained home — with its own kitchen, bathroom, sleeping, and living areas — that has a separate, independent entrance. Specifically, attached ADUs differ from detached ADUs (which stand apart from the main house) and junior ADUs (which convert interior space without a separate entrance in all cases).
Are attached ADUs cheaper to build than detached ADUs?
In most cases, yes. Attached ADUs share a wall and utility connections with the primary residence, which reduces foundation costs, shortens utility runs, and eliminates the need for a fully independent building envelope. As a result, total construction costs for attached ADUs are typically 15–25% lower than comparable detached builds. Furthermore, garage conversions — which convert an already-existing attached structure — represent the most cost-effective ADU type overall.
Do attached ADU designs require a separate entrance?
Yes — in virtually all jurisdictions, a dedicated, lockable entrance that opens directly to the outside is required for a unit to qualify as an ADU. The entrance cannot pass through the main home’s living space. In practice, side-yard doors, courtyard gates, and breezeway vestibules are the most common attached ADU entry solutions.
How do I make an attached ADU feel private from the main home?
Privacy in an attached ADU comes from four sources: acoustic wall assemblies (staggered studs, mineral wool, resilient channels), strategic entry placement (side yards, courtyards, breezeways), window positioning (no direct sight lines between units), and buffer zones along the shared wall (closets, laundry, storage). Together, these design choices can make an attached ADU feel as private as a detached structure.
How large can an attached ADU be?
Size limits vary by jurisdiction. In California, state law generally allows attached ADUs up to 850 sq ft (or up to 1,000 sq ft for a two-bedroom unit) and prohibits cities from applying lot coverage or FAR restrictions that would prevent an ADU of at least that size. However, local ordinances can allow larger attached ADUs in some cases — up to 50% of the main home’s floor area in many cities.
Can I rent out an attached ADU?
Yes. In California and most other states that have passed ADU-friendly legislation, attached ADUs can be rented to tenants. Owner-occupancy requirements have been eliminated or significantly relaxed in many jurisdictions. However, short-term rental restrictions (under 30 days) may still apply in some cities — check your local ordinance before listing on a short-term rental platform.
Key Takeaways
- Attached ADU designs connect a self-contained dwelling to the primary residence — reducing costs, shortening utility runs, and speeding permits. For a deeper walkthrough, see our Affordable ADU Construction: Costs, Permits, and Savings. Also reference the ultimate ADU guide.
- Five main layout types — side addition, rear addition, garage conversion, breezeway connection, and above-garage — serve different lot shapes and budgets.
- Acoustic privacy is achievable through staggered studs, mineral wool insulation, resilient channels, and strategic buffer zones along the shared wall.
- Construction costs typically range from $80,000 (garage conversion) to $380,000+ (large two-bedroom addition) depending on size, location, and finish level.
- Permit compliance requires a separate entrance, fire-rated shared wall, egress windows, full kitchen, and energy documentation.
- ROI comes from rental income, appraisal value increases, and caregiver or multigenerational housing savings.
- A seven-step process — from site feasibility through certificate of occupancy — keeps projects on schedule and on budget.
Conclusion: Build Smarter With Attached ADU Designs
Attached ADU designs deliver a rare combination of lower construction cost, faster permit timelines, and genuine privacy — when planned with the right entries, acoustic assemblies, and site strategy. Whether your goal is multigenerational living, long-term rental income, caregiver accommodation, or a dedicated workspace, an attached ADU can be designed to meet it precisely.
Furthermore, the attached approach consistently outperforms the detached alternative on cost and lot efficiency — making it the smarter starting point for most urban and suburban homeowners.
To take the next step, explore detailed checklists, regional case studies, and financing options at theadupro.com. Shortlist two attached ADU designs that fit your lot, confirm your local code triggers, and request contractor pricing — then submit permits with confidence. Last updated: 2026-06-26. Author: The ADU Pro team.
Terminology note: Throughout this article, “attached ADU,” “attached accessory dwelling unit,” and “in-law suite” refer to a complete secondary dwelling that is structurally connected to the primary residence while maintaining a separate, independent entrance.