Backyard Studio Designs: Smart Plans, Costs, and Tips
To begin with, backyard studio designs give you a compact, detached space that works as an office, art room, or guest micro‑suite. Therefore, this guide shows how to plan, budget, permit, and build with confidence. In short, you will learn practical steps, proven layouts, and material choices you can act on today.
To clarify, “backyard studio designs” is a practical term for small building plans tailored to residential lots. Specifically, a backyard studio design sets the footprint, door and window placement, utility routes, insulation levels, and finish details. Consequently, you gain a quiet, purpose‑built zone only steps from home.

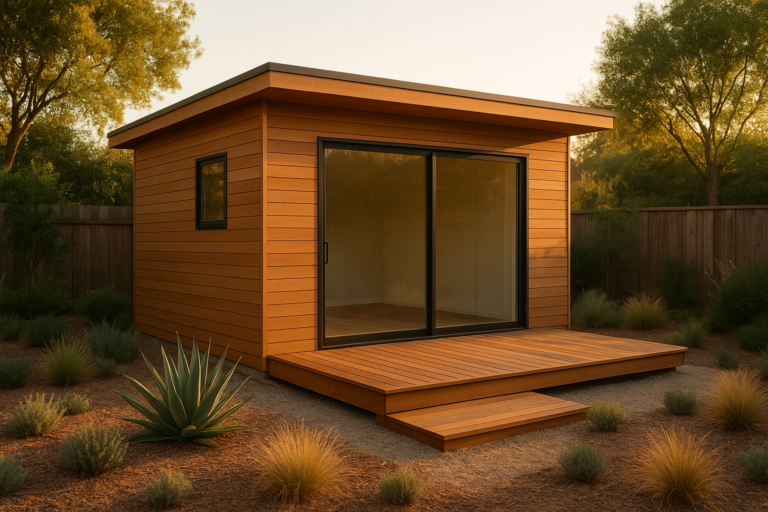
This modern concept illustrates light, flow, and privacy for backyard studio designs.
In practice, backyard studio designs are small, detached building plans that optimize work, creativity, or guest stays on your lot. As a result, the best designs balance size, daylight, storage, and code requirements while staying on budget.
- To begin with, confirm zoning, setbacks, and utility access.
- Next, select a layout that fits your daily tasks and equipment.
- Finally, price materials and labor with a clear contingency.
What is backyard studio designs?
To answer directly, backyard studio designs are planning frameworks for small detached structures that support focused work or flexible living. Specifically, they cover size, placement, structure, utilities, and finishes so you can build a safe, efficient studio.
Additionally, many communities treat a studio like an accessory structure or an accessory dwelling unit (ADU). For clarity, an Accessory Dwelling Unit is a secondary housing unit on the same lot as a primary home, which may require permits and utility upgrades.
Overall, the core idea is simple: define needs, respect the site, and design for comfort and code. In short, good design leads to fewer surprises.
Backyard studio designs: Essential planning checklist
To begin with, start your project with facts, not guesses. Consequently, this checklist prevents expensive redesigns and delays.
- Firstly, map setbacks, easements, and tree protection zones.
- Secondly, measure slopes and drainage paths to plan foundations.
- Thirdly, confirm utility capacity for power, data, water, and sewer.
- Additionally, define the core use: office, art, music, gym, or guest.
- Moreover, right‑size storage for tools, canvases, or instruments.
- In addition, plan daylight and view, but protect privacy and glare.
- Meanwhile, choose a foundation suited to soil and frost depth.
- Finally, document a realistic budget with a 10–15% contingency.
In summary, a clear checklist gives your builder and inspector the same picture.

This plan view shows how small footprints can feel generous with smart zoning.
How to budget backyard studio designs
To start, list every scope item in plain language. For example, write “insulated slab, minisplit heat pump, and standing‑seam roof” rather than “shell and HVAC.” Therefore, your quotes will align and you can compare costs fairly.
Budget rule of thumb
In short, costs rise with complexity and finish level. Consequently, keep forms simple, prioritize envelope performance, and phase non‑essentials.
- Firstly, set a target total and a must‑have list.
- Secondly, collect at least three itemized bids.
- Thirdly, separate site work from the building shell.
- Additionally, include permits, design fees, and utility fees.
- Moreover, hold 10–15% as contingency for surprises.
As a resource, you can review an example design scope at The ADU Pro — Stanton ADU Design, which shows how a clear plan speeds approvals and pricing.
Small lot solutions: Compact studio layouts that work
To maximize utility, think in zones rather than rooms. Consequently, a storage wall, fold‑down desk, and corner wet bar can replace separate spaces. In contrast, big doors and clerestory windows stretch sightlines and boost comfort.
- For instance, a 10×12 creator’s pod fits a desk, storage, and a stool.
- Additionally, a 12×18 office+guest setup adds a sofa bed and pocket bath.
- Meanwhile, a 14×20 music studio benefits from a vestibule and acoustic layers.
- Finally, a 16×24 ADU studio supports a kitchenette and accessible bath.
In essence, compact layouts succeed when circulation is simple and storage is integrated.

Acoustic layering and a small vestibule make music-focused layouts feel professional.
Materials and sustainability for backyard studios
To reduce energy bills, prioritize the envelope first. Therefore, specify continuous exterior insulation, airtight sheathing, and high‑performance windows. Additionally, add a compact heat pump and a heat‑pump water heater for efficient comfort.
In addition, choose durable cladding like fiber‑cement, metal, or rot‑resistant wood. Meanwhile, use low‑VOC finishes for healthy indoor air. Because of this, maintenance stays low and comfort stays high.
“Ultimately, the greenest square foot is the one you design to serve more than one function: work, rest, and storage in a single adaptable volume.”
Overall, resilient materials pay back through fewer repairs and better livability.
Permits, codes, and utilities for ADU studios
To avoid delays, confirm whether your studio is an ADU or an accessory structure. Consequently, zoning, fire setbacks, and height limits may change. Additionally, utility connections—especially sewer—can shift costs the most.
- Firstly, verify setbacks, height, and lot coverage with the local planner.
- Secondly, ask about separate meters versus shared services.
- Thirdly, plan trench paths early to dodge roots and hardscape.
- Moreover, request pre‑submittal feedback on your drawings.
For financing, you can explore tailored options at The ADU Pro — Glendale ADU Loans. In many cases, specialized lenders understand ADU timelines and appraisals better than general lenders.
In summary, clear drawings plus early utility checks set smooth inspections.
Backyard studio designs inspiration by use case
To spark ideas, match the plan to your day. Therefore, choose light, storage, and acoustics based on real tasks, not trends.
- For example, a painter needs north light, a wash sink, and floor protection.
- In contrast, a podcaster wants isolation, soft surfaces, and cable routing.
- Additionally, a remote worker values glare control, ethernet, and thermal comfort.
- Meanwhile, a guest micro‑suite benefits from a privacy screen and a mini split.
As a next step, you can browse design case studies on theadupro.com to compare sizes, forms, and approvals.
Which structure type fits best?
To choose wisely, compare simplicity, expandability, and long‑term value. Therefore, use the quick comparison below as a starting point.
| Type | Pros | Cons |
|---|---|---|
| Panelized kit | Fast setup; predictable cost | Limited customization; shipping lead times |
| Site‑built | Highly flexible; local materials | Weather delays; coordination needed |
| Prefab module | Quality control; short onsite time | Crane access; transport permits |
In short, pick the delivery method that best matches your site access and schedule.
Step‑by‑step: From idea to move‑in
To keep momentum, follow a simple, proven path. Consequently, you will reduce rework and keep costs realistic.
- Firstly, define the main use and required equipment.
- Secondly, confirm zoning, setbacks, and utilities with the city.
- Thirdly, survey or measure the lot and mark potential footprints.
- Additionally, sketch two layouts and test furniture at full scale with tape.
- Moreover, choose structure type: panel kit, site‑built, or prefab module.
- Next, draft permit drawings and request pre‑submittal notes.
- Then, finalize finishes, energy targets, and acoustic needs.
- Afterward, collect itemized bids and verify schedules and warranties.
- Subsequently, pull permits, prep the site, and pour or set the foundation.
- Finally, build the shell, install services, pass inspections, and furnish.
Ultimately, a clear sequence prevents scope creep and protects your timeline.

A warm interior palette supports focus while keeping costs controlled.
Common mistakes to avoid in backyard studio designs
To stay on track, design for function before finishes. For example, place outlets where tools live, not where walls look empty. Additionally, avoid under‑sizing doors that must clear large canvases or instruments.
- Firstly, do not skip an airtight layer and proper ventilation.
- Secondly, avoid shallow roof overhangs in wet or sunny climates.
- Thirdly, confirm structural capacity before heavy shelving installs.
- Moreover, protect data cables from power interference.
In brief, details make small spaces feel large and last longer.
Real‑world design tips that elevate small studios
To enhance comfort, use layered lighting: ambient, task, and accent. Therefore, add dimmers and warm‑cool selection to match time of day. Additionally, place windows so daylight falls beside screens, not across them.
- For instance, choose a 36‑inch entry door for easy move‑in and move‑out.
- Moreover, hide a murphy table in a shallow cabinet for pop‑up work zones.
- Meanwhile, tuck a vented dryer box if textiles or towels are part of the work.
- Finally, add a covered stoop to extend use during rain or heat.
Overall, small upgrades compound into big daily comfort.
Pros and cons at a glance
To decide clearly, weigh the benefits and tradeoffs side by side.
- Pros: Dedicated focus, flexible use, adds property value, and short commute.
- Cons: Up‑front cost, permitting complexity, and utility coordination.
In essence, the gains outlast the brief build phase when you plan well.
Key takeaways
- To begin with, backyard studio designs work best when scope is crystal clear.
- Additionally, early utility checks prevent cost shocks later.
- Moreover, compact layouts thrive on built‑in storage and tall glazing.
- Finally, durable materials and tight envelopes cut long‑term costs.
In short, simple forms plus thoughtful details equal lasting performance.
Conclusion: Plan better backyard studio designs today
To wrap up, backyard studio designs deliver quiet, efficient space with a short daily commute. Therefore, define needs, verify codes, and commit to an energy‑smart shell. In addition, explore proven examples and financing help at theadupro.com so you can move from idea to keys in hand.
Ultimately, your best design is the one you will use every day, in every season.
FAQ: Quick answers
How big should a backyard studio be?
To stay flexible, start near 120–180 sq ft for work‑only uses and 240–400 sq ft for guest‑ready ADU studios. Additionally, check local thresholds that trigger extra requirements.
Do I need a permit for a studio?
To be compliant, always ask your jurisdiction first. Moreover, many regions allow small accessory structures by right but still require zoning checks and utility approvals.